Introduction
Containers have revolutionized application development and delivery on account of their ease of use, portability and consistency. And when it comes to automatically deploying and managing containers in the cloud (public, private or hybrid), one of the most popular options today is Kubernetes.
Kubernetes is an open source project designed specifically for container orchestration. Kubernetes offers a number of key features, including multiple storage APIs, container health checks, manual or automatic scaling, rolling upgrades and service discovery. Applications can be installed to a Kubernetes cluster via Helm charts, which provide streamlined package management functions.
If you’re new to Kubernetes and Helm charts, one of the easiest ways to discover their capabilities is with Bitnami. Bitnami offers a number of stable, production-ready Helm charts to deploy popular software applications, such as WordPress, Magento, Redmine and many more, in a Kubernetes cluster. Or, if you’re developing a custom application, it’s also possible to use Bitnami’s Helm charts to package and deploy it for Kubernetes.
This guide walks you through the process of bootstrapping an example MongoDB, Express, Angular and Node.js (MEAN) application on a Kubernetes cluster. It uses a custom Helm chart to create a Node.js and MongoDB environment and then clone and deploy a MEAN application from a public Github repository into that environment. Once the application is deployed and working, it also explores some of Kubernetes’ most interesting features: cluster scaling, load-balancing, and rolling updates.
Assumptions and Prerequisites
This guide focuses on deploying an example MEAN application in a Kubernetes cluster running on either Google Container Engine (GKE) or Minikube. The example application is a single-page Node.js and Mongo-DB to-do application available on Github.
This guide makes the following assumptions:
- You have a Kubernetes 1.5.0 (or later) cluster.
- You have `kubectl` installed and configured to work with your Kubernetes cluster.
- You have `git` installed and configured.
- You have a basic understanding of how containers work. Learn more about containers on Wikipedia and on ZDNet.
TIP: If you don’t already have a Kubernetes cluster, the easiest way to get one is via GKE or Minikube. For detailed instructions, refer to our starter tutorial. NOTE: GKE is recommended for production deployments because it is a production-ready environment with guaranteed uptime, load balancing and included container networking features. That said, the commands shown in this guide can be used on both GKE and Minikube. Commands specific to one or the other platform are explicitly called out as such.
Step 1: Validate the Kubernetes cluster
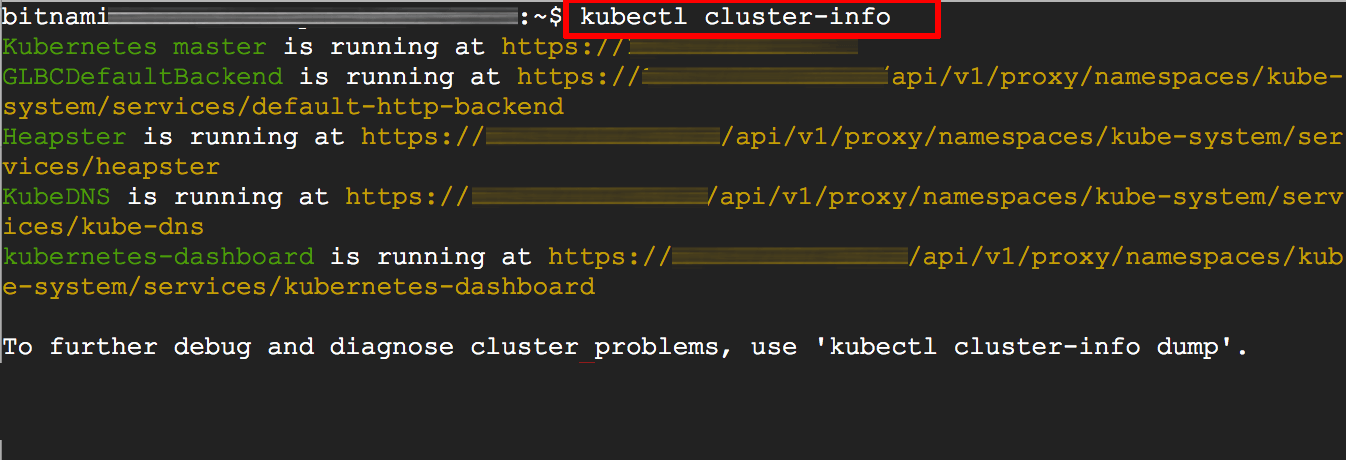
First, ensure that you are able to connect to your cluster with kubectl cluster-info. This command is also a good way to get the IP address of your cluster.
kubectl cluster-info
You should see output similar to the following:
This is also a good time to get some information about the physical nodes in the cluster with kubectl get nodes:
kubectl get nodes
Sample output is shown below:

TIP: For detailed cluster health and status, visit the Kubernetes dashboard.
Step 2: Install Helm and Tiller
To install Helm, execute these commands:
curl https://raw.githubusercontent.com/kubernetes/helm/master/scripts/get > get_helm.sh
chmod 700 get_helm.sh
./get_helm.sh
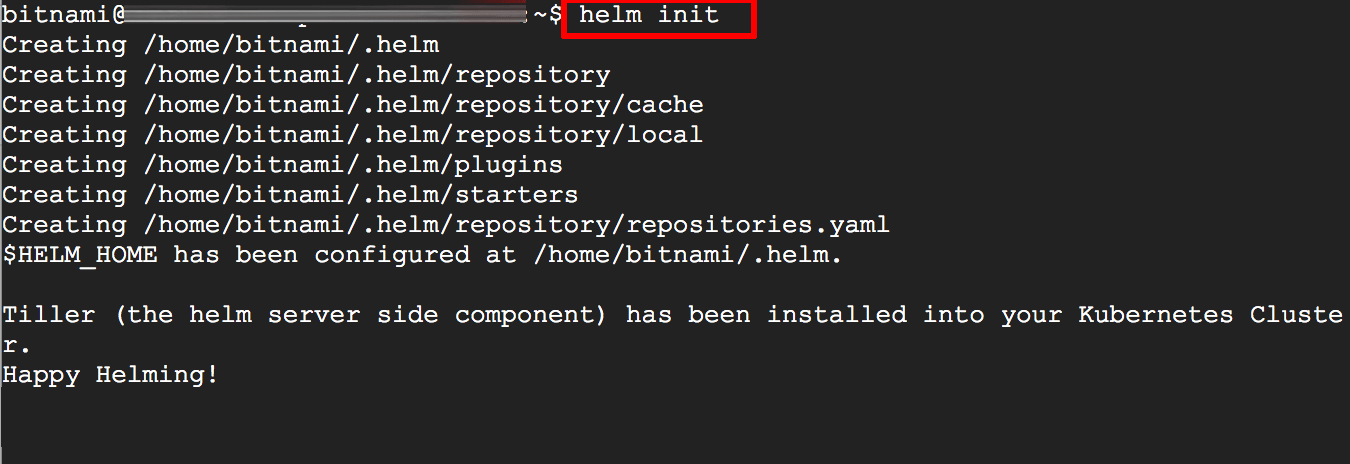
Once the installation process completes, install Helm’s server-side counterpart, Tiller, with the helm init command:
helm init
You should see something similar to the output below:
Check that Tiller is installed by checking the output of kubectl get pods as shown below:
kubectl --namespace kube-system get pods | grep tiller

Step 3: Deploy the example application
The smallest deployable unit in Kubernetes is a “pod”. A pod consists of one or more containers which can communicate and share data with each other. Pods make it easy to scale applications: scale up by adding more pods, scale down by removing pods. Learn more about pods.
The Helm chart used in this guide deploys the example to-do application as two pods: one for Node.js and the other for MongoDB. This is considered a best practice because it allows a clear separation of concerns, and it also allows the pods to be scaled independently (you’ll see this in the next section).
NOTE: The Helm chart used in this guide has been developed to showcase the capabilities of both Kubernetes and Helm, and has been tested to work with the example to-do application. It can be adapted to work with other MEAN applications, but it may require some changes to connect the MongoDB pod with the application pod.
To deploy the sample application using a Helm chart, follow these steps:
- Clone the Helm chart from Bitnami’s Github repository:
git clone https://github.com/bitnami/charts.git cd charts/incubator/mean - Check for and install missing dependencies with
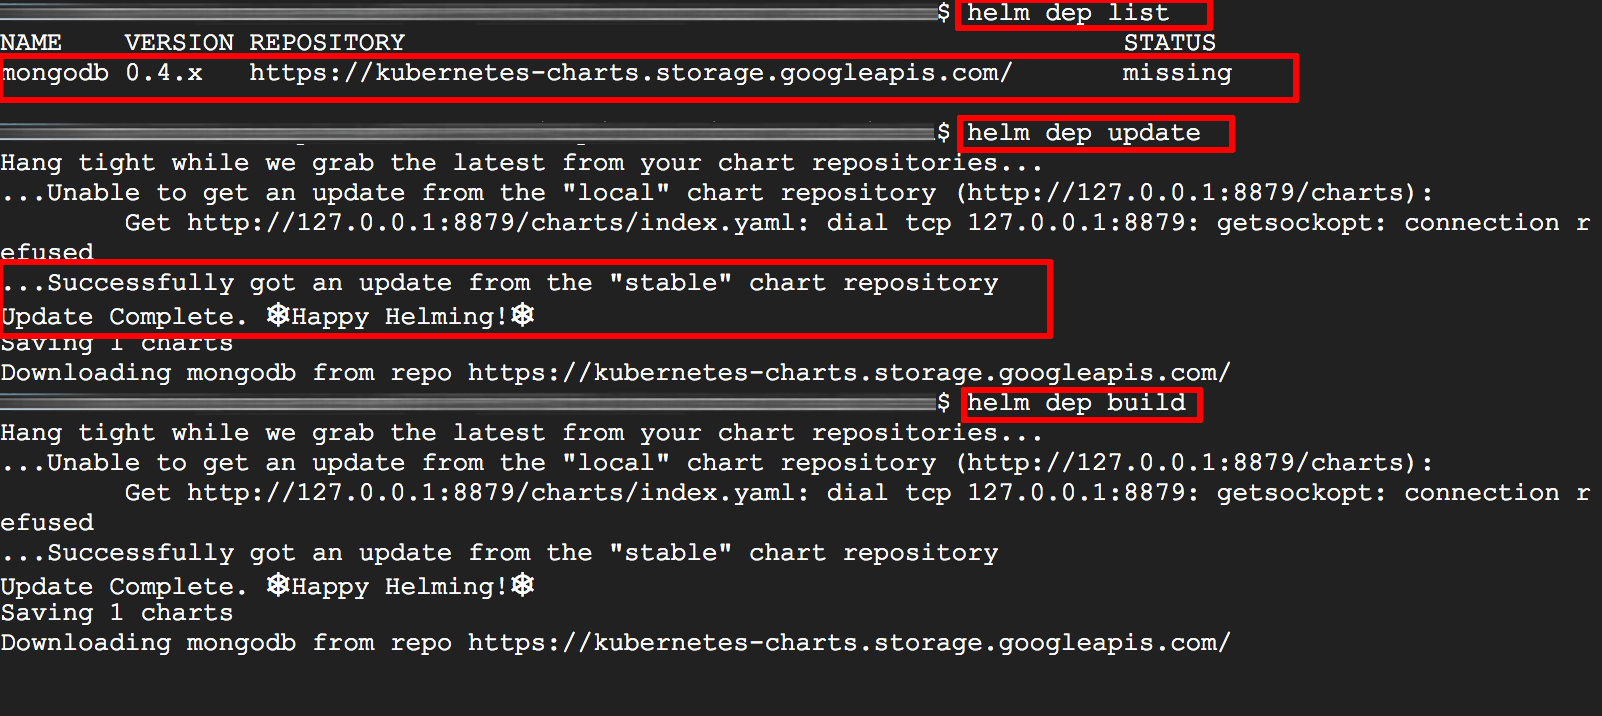
helm dep. The Helm chart used in this example is dependent on the MongoDB chart in the official repository, so the commands below will take care of identifying and installing the missing dependency.helm dep list helm dep update helm dep buildHere’s what you should see:
- Lint the chart with
helm lintto ensure it has no errors.helm lint . - Deploy the Helm chart with
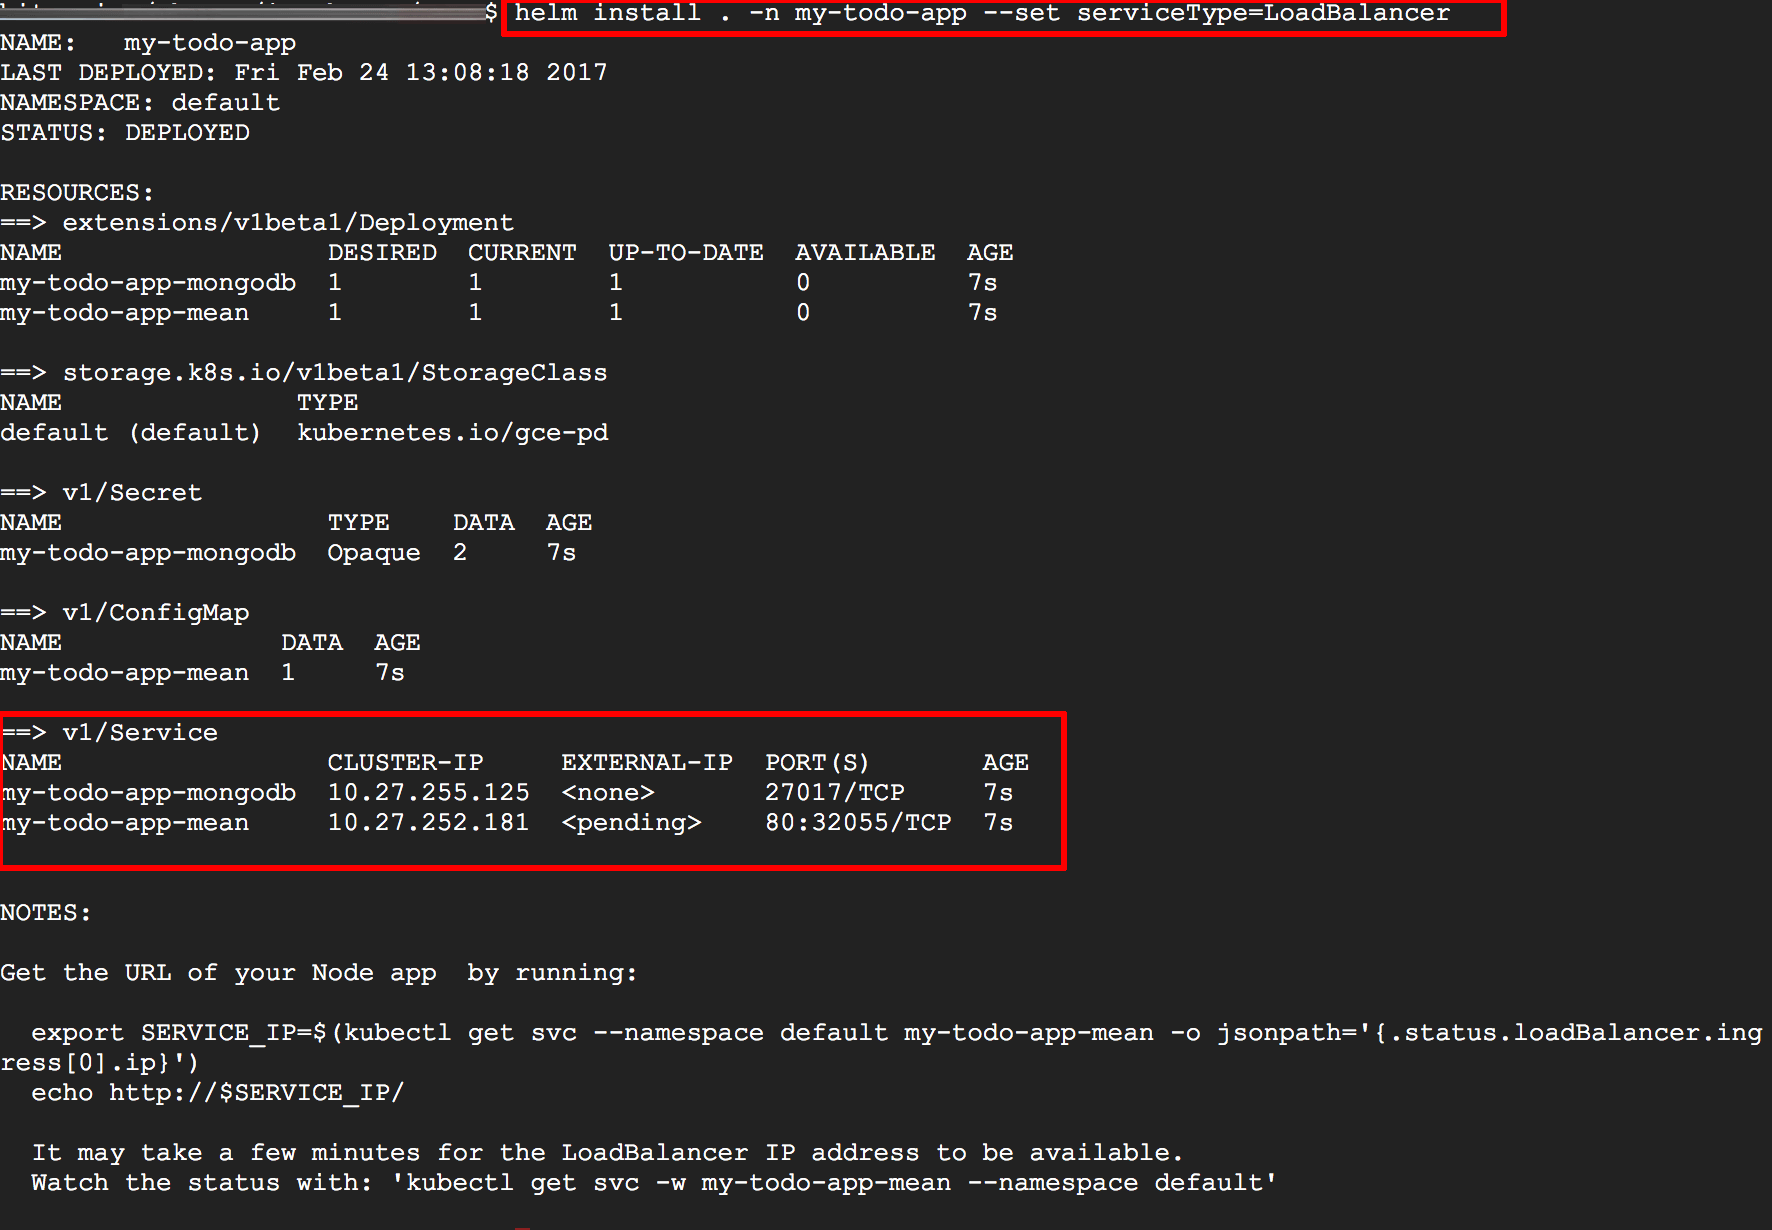
helm install. This will produce two pods (one for the Node.js service and the other for the MongoDB service). Pay special attention to the NOTES section of the output, as it contains important information to access the application.NOTE: If you don’t specify a release name with the *
helm install . --name my-todo-app --set serviceType=LoadBalancerYou should see something like the output below as the chart is installed.
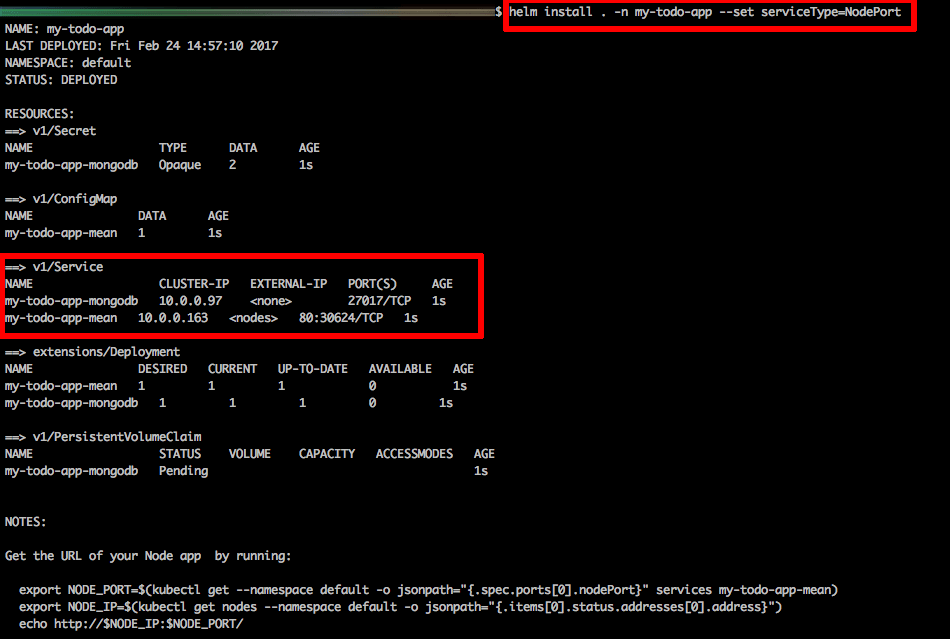
 Unlike cloud platforms, Minikube doesn’t support a load balancer so, if you’re deploying the application on Minikube, use the command below instead:
helm install . --name my-todo-app --set serviceType=NodePortYou should see the output below as the chart is installed on Minikube.
- Get the URL for the Node application by executing the commands shown in the output of
helm install, or by usinghelm status my-todo-appand checking the output for the external IP address. If you deployed the application on GKE, use these commands to obtain the URL for the Node application:export SERVICE_IP=$(kubectl get svc --namespace default my-todo-app-mean -o jsonpath='{.status.loadBalancer.ingress[0].ip}') echo http://$SERVICE_IP/If you deployed the application on Minikube, use these commands instead to obtain the URL for the Node application:
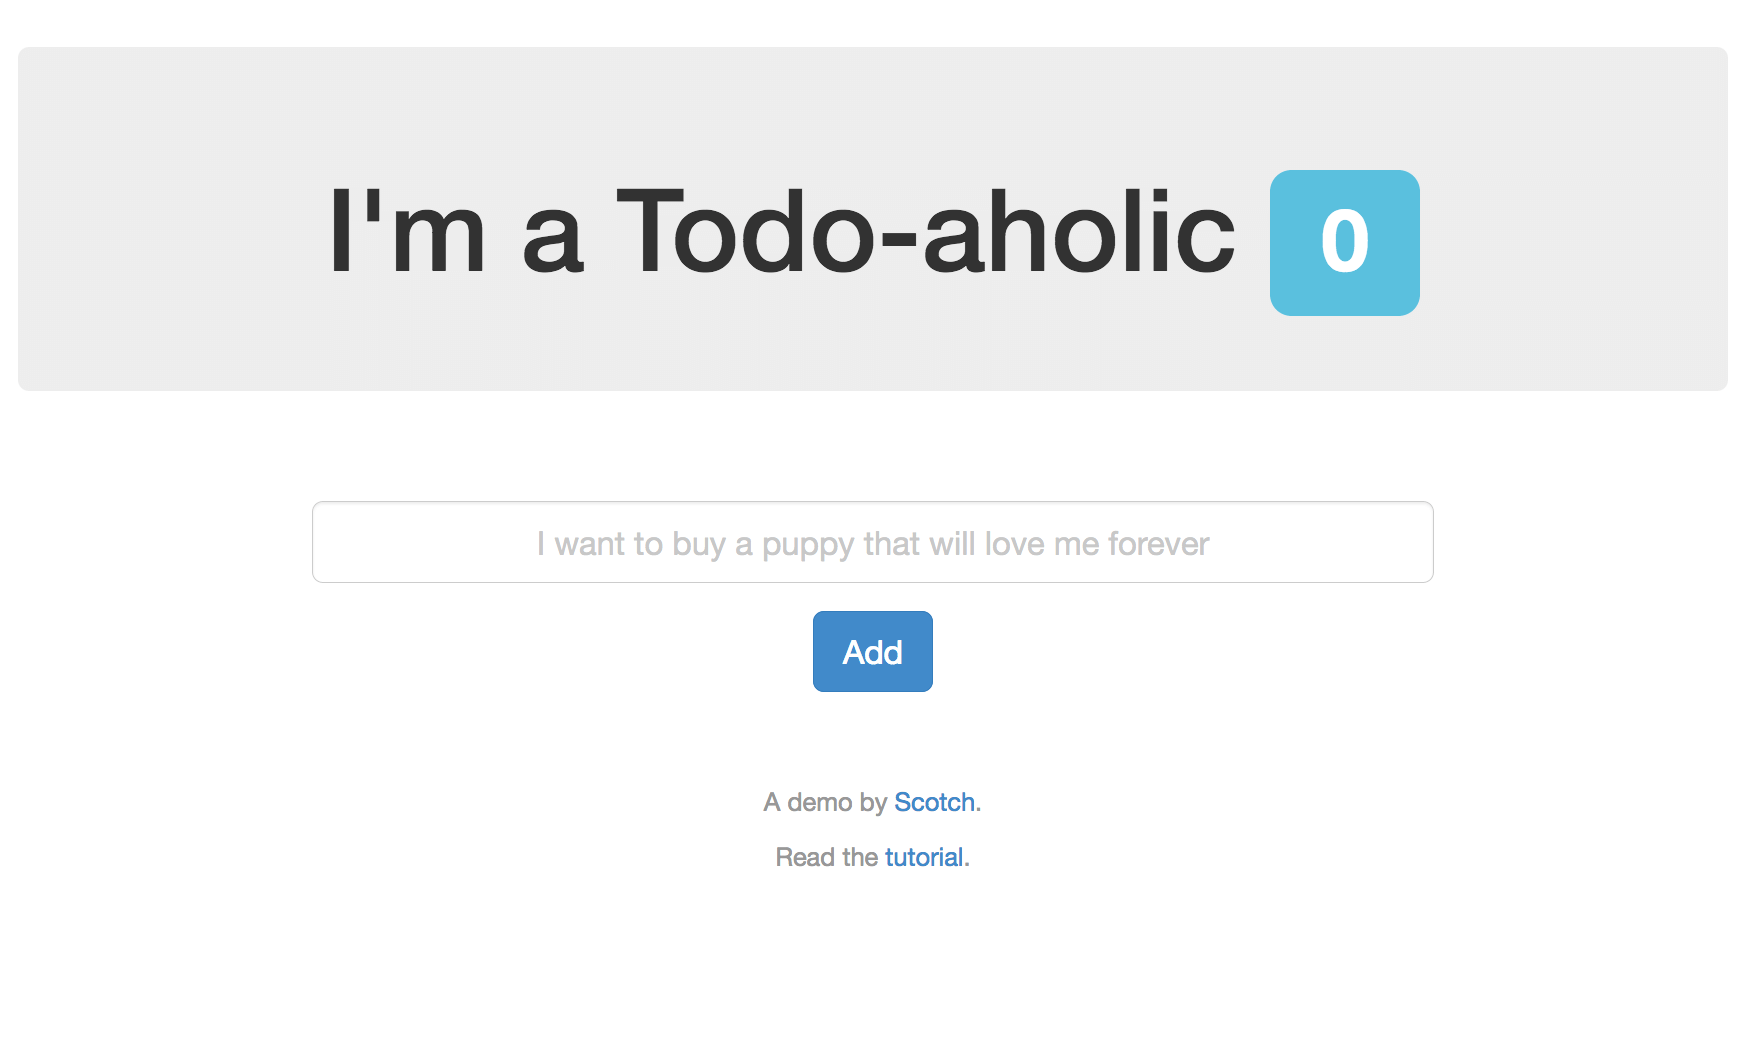
export NODE_PORT=$(kubectl get --namespace default -o jsonpath="{.spec.ports[0].nodePort}" services my-todo-app-mean) export NODE_IP=$(kubectl get nodes --namespace default -o jsonpath="{.items[0].status.addresses[0].address}") echo http://$NODE_IP:$NODE_PORT/ - Browse to the specified URL and you should see the sample application running. Here’s what it should look like:
 To debug and diagnose deployment problems, use
 kubectl get pods -l app=my-todo-app-mean. If you specified a different release name (or didn’t specify one), remember to use the actual release name from your deployment. To delete and reinstall the Helm chart at any time, use thehelm deletecommand, shown below. The additional--purgeoption removes the release name from the store so that it can be reused later.helm delete --purge my-todo-app
Step 4: Explore Kubernetes and Helm
TIP: Once you’ve got your application running on Kubernetes, read our guide on performing more complex post-deployment tasks, including setting up TLS with Let’s Encrypt certificates and performing rolling updates.
Scale up (or down)
NOTE: For simplicity, this section focuses only on scaling the Node.js pod.
As more and more users access your application, it becomes necessary to scale up in order to handle the increased load. Conversely, during periods of low demand, it often makes sense to scale down to optimize resource usage.
Kubernetes provides the kubectl scale command to scale the number of pods in a deployment up or down. Learn more about the kubectl scale command.
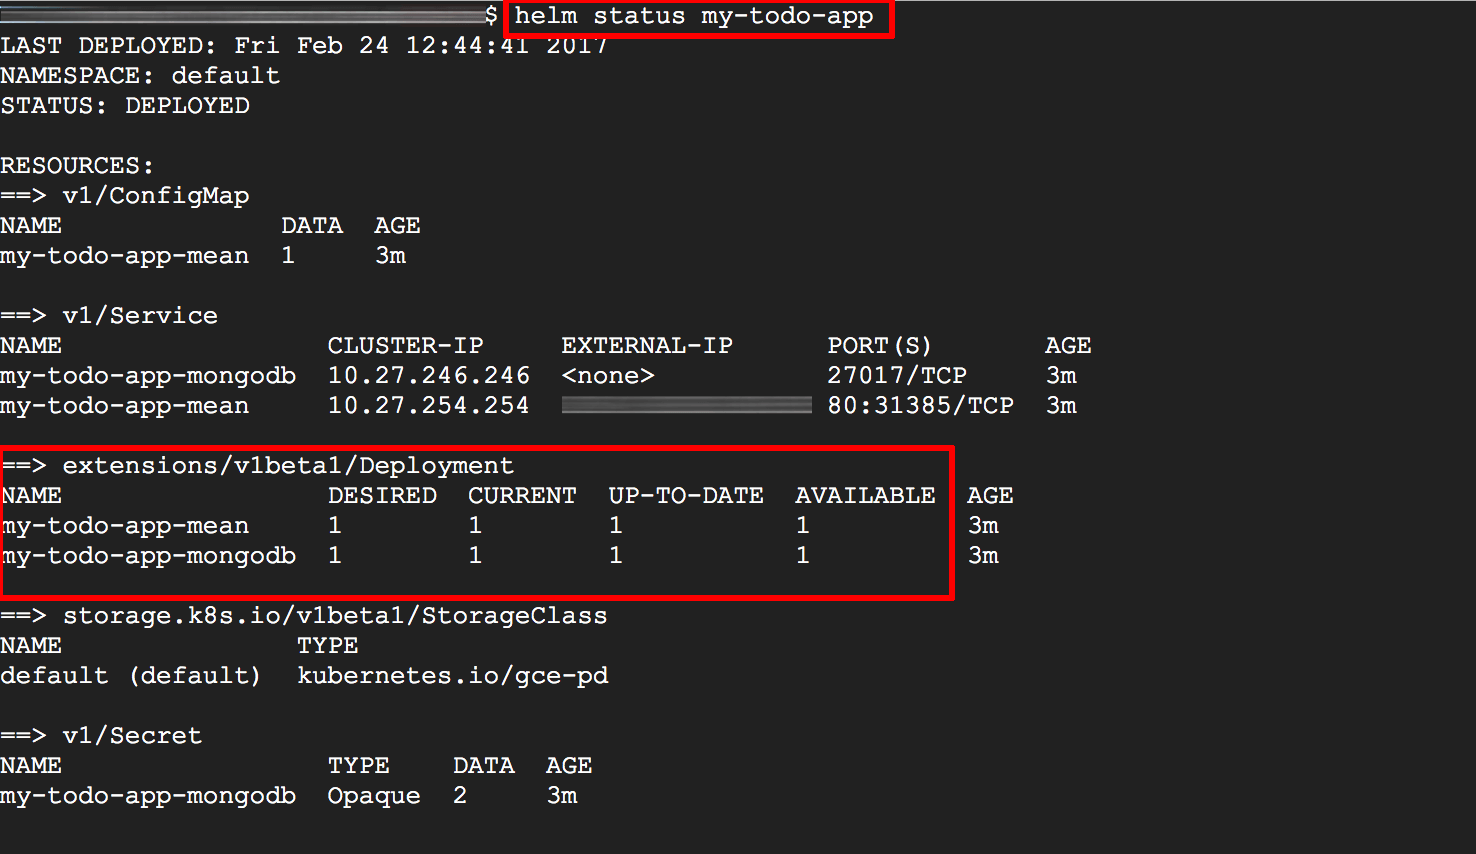
Verify the number of pods currently running for each service with the helm status command, as shown below:
helm status my-todo-app
The output should show you one running instance of each pod.
Then, scale the Node.js pod up to three copies using the kubectl scale command below.
kubectl scale --replicas 3 deployment/my-todo-app-mean
Check the status as before to verify that you have three Node.js pods.

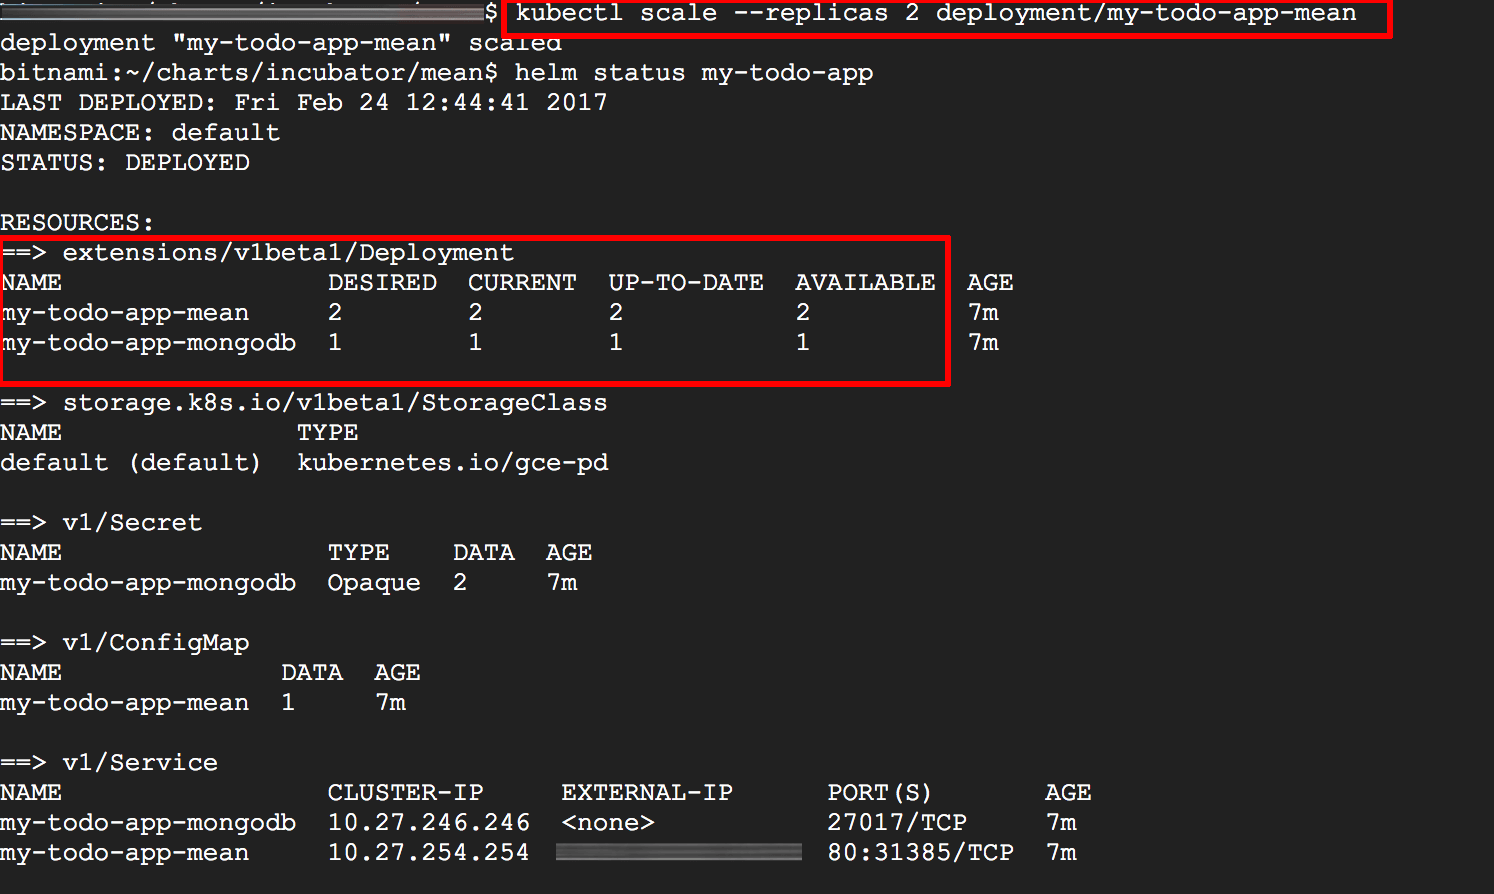
Then, scale it back down to two using the command below:
kubectl scale --replicas 2 deployment/my-todo-app-mean
Check the status as before to verify that you have two Node.js pods.
A key feature of Kubernetes is that it is a self-healing system: if one or more pods in a Kubernetes cluster are terminated unexpectedly, the cluster will automatically spin up replacements. This ensures that the required number of pods are always running at any given time.
To see this in action, use the kubectl get pods command to get a list of running pods, as shown below:
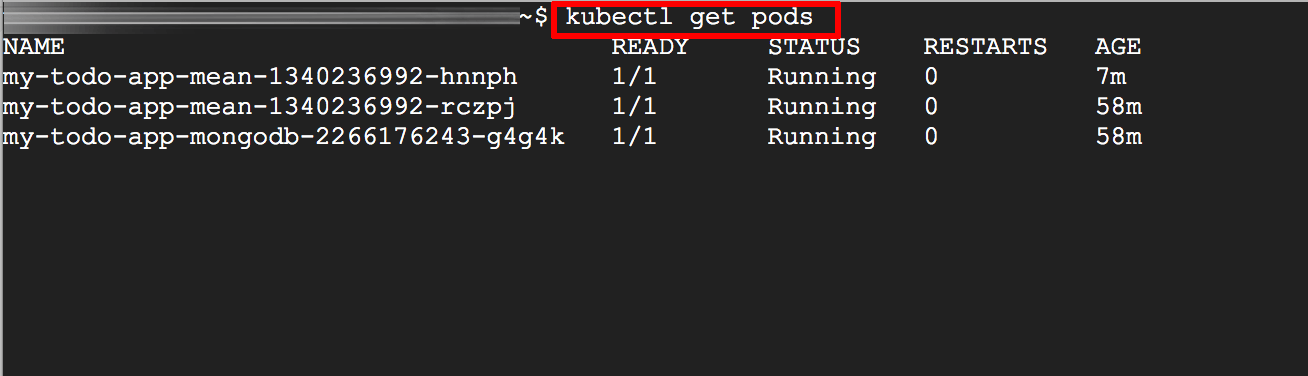
As you can see, this cluster has been scaled up to have 2 Node.js pods. Now, select one of the Node.js pods and simulate a pod failure by deleting it with a command like the one below. Replace the POD-ID placeholder with an actual pod identifier from the output of the kubectl get pods command.
kubectl delete pod POD-ID
Now, run kubectl get pods -w again and you will see that Kubernetes has instantly replaced the failed pod with a new one:
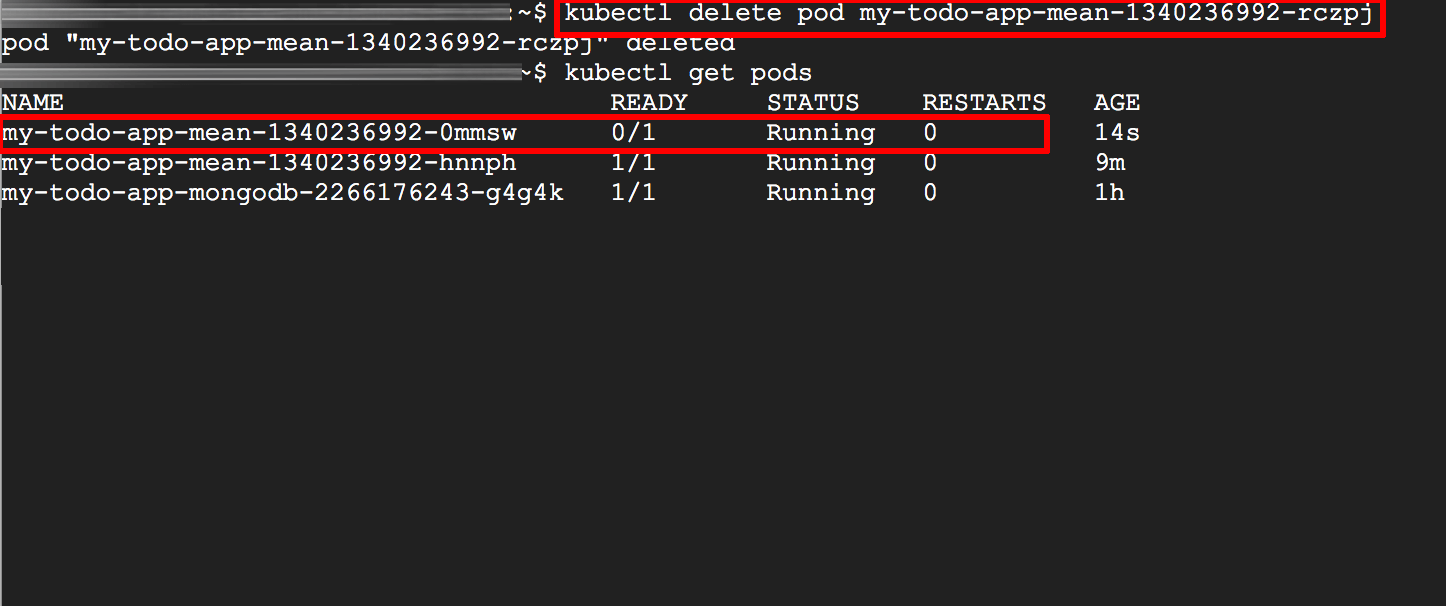
If you keep watching the output of kubectl get pods -w, you will see the state of the new pod change rapidly from “Pending” to “Running”.
Balance traffic between pods
It’s easy enough to spin up two (or more) replicas of the same pod, but how do you route traffic to them? When deploying an application to a Kubernetes cluster in the cloud, you have the option of automatically creating a cloud network load balancer (external to the Kubernetes cluster) to direct traffic between the pods. This load balancer is an example of a Kubernetes Service resource. Learn more about services in Kubernetes.
You’ve already seen a Kubernetes load balancer in action. When deploying the application to GKE with Helm, the command used the serviceType option to create an external load balancer, as shown below:
helm install . --name my-todo-app --set serviceType=LoadBalancer
When invoked in this way, Kubernetes will not only create an external load balancer, but will also take care of configuring the load balancer with the internal IP addresses of the pods, setting up firewall rules, and so on. To see details of the load balancer service, use the kubectl describe svc command, as shown below:
kubectl describe svc my-todo-app
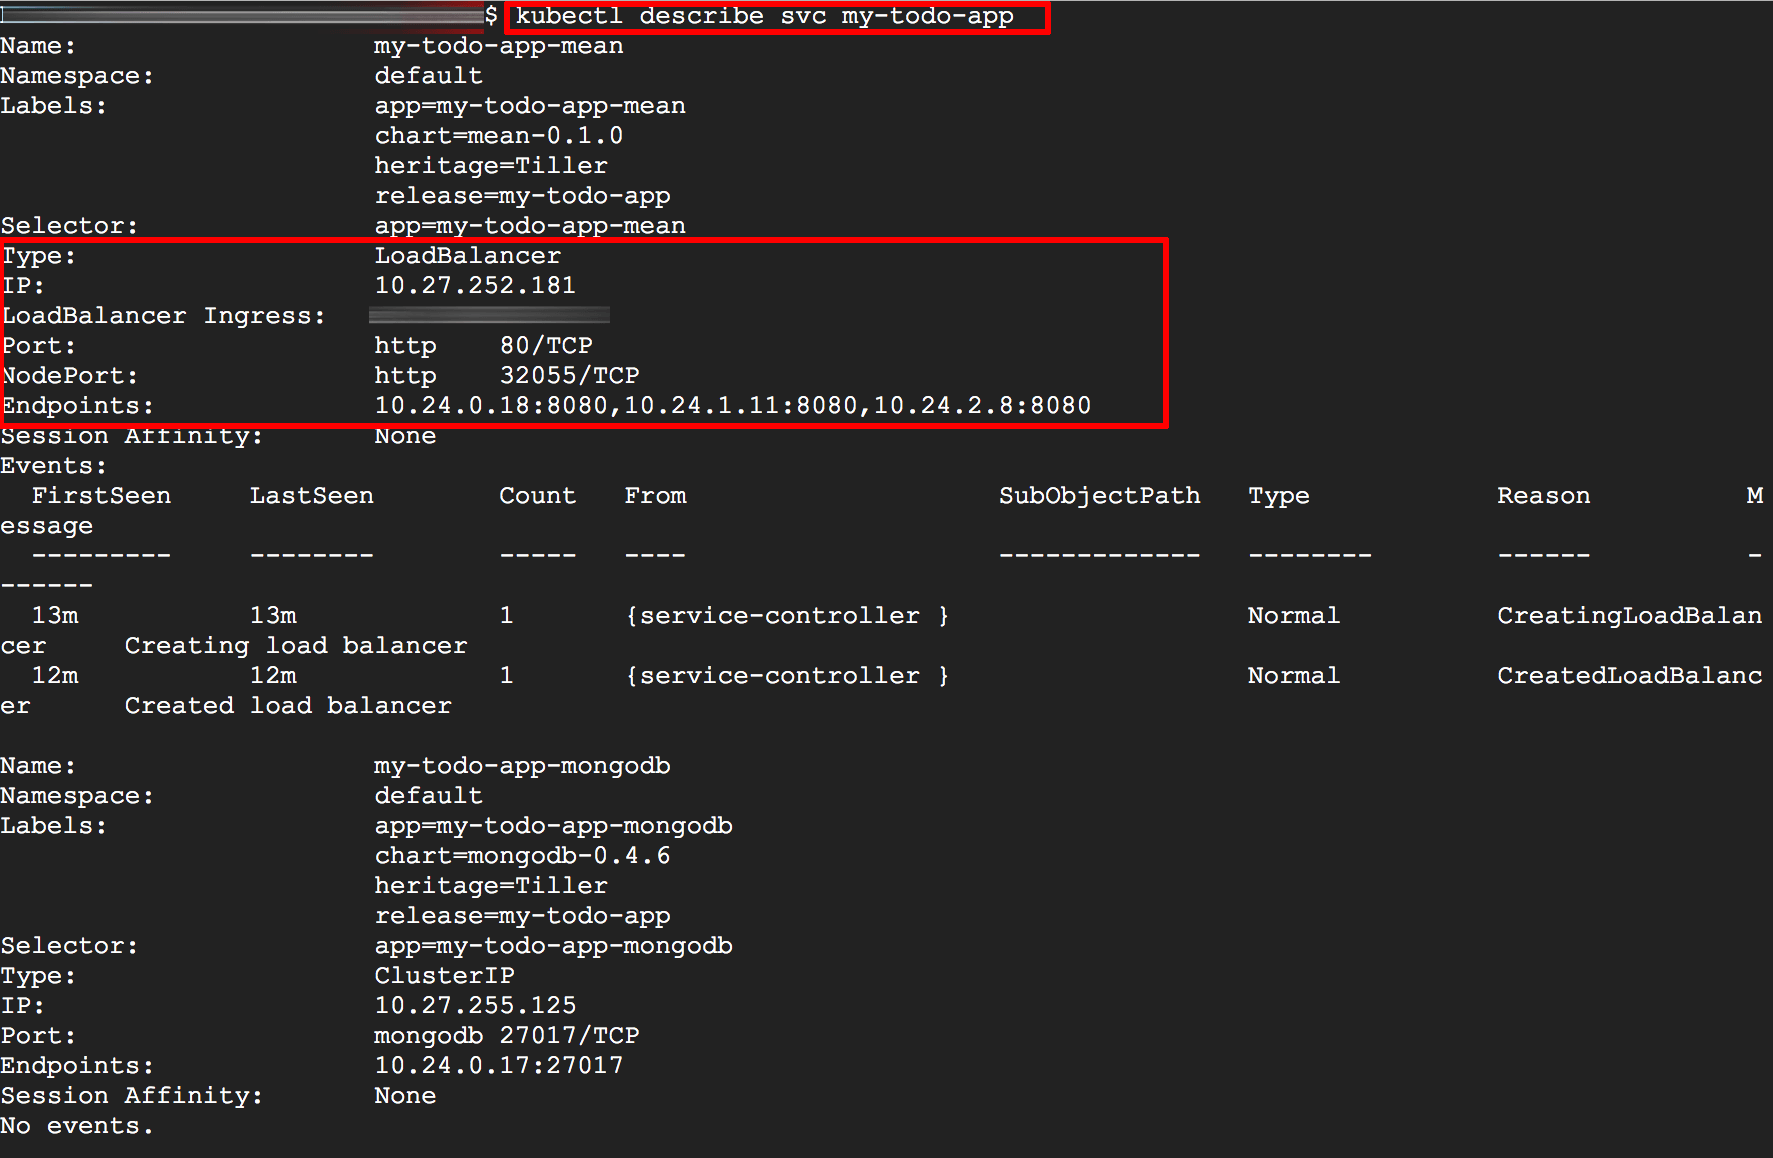
Notice the LoadBalancer Ingress field, which specifies the IP address of the load balancer, and the Endpoints field, which specifies the internal IP addresses of the three Node.js pods in use. Similarly, the Port field specifies the port that the load balancer will listen to for connections (in this case, 80, the standard Web server port) and the NodePort field specifies the port on the internal cluster node that the pod is using to expose the service.
Obviously, this doesn’t work quite the same way on a Minikube cluster running locally. Look back at the Minikube deployment and you’ll see that the serviceType option was set to NodePort. This exposes the service on a specific port on every node in the cluster.
helm install . --name my-todo-app --set serviceType=NodePort
Verify this by checking the details of the service with kubectl describe svc:
kubectl describe svc my-todo-app
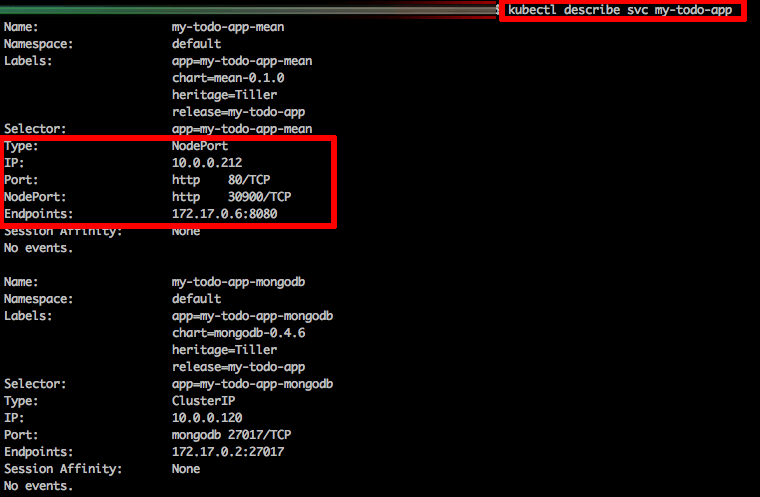
The main difference here is that instead of an external network load balancer service, Kubernetes creates a service that listens on each node for incoming requests and directs it to the static open port on each endpoint.
Perform rolling updates (and rollbacks)
Rolling updates and rollbacks are important benefits of deploying applications into a Kubernetes cluster. With rolling updates, devops teams can perform zero-downtime application upgrades, which is an important consideration for production environments. By the same token, Kubernetes also supports rollbacks, which enable easy reversal to a previous version of an application without a service outage. Learn more about rolling updates.
Helm makes it easy to upgrade applications with the helm upgrade command, as shown below:
helm upgrade my-todo-app .
Check upgrade status with the helm history command shown below:
helm history my-todo-app
Here’s what it looks like:
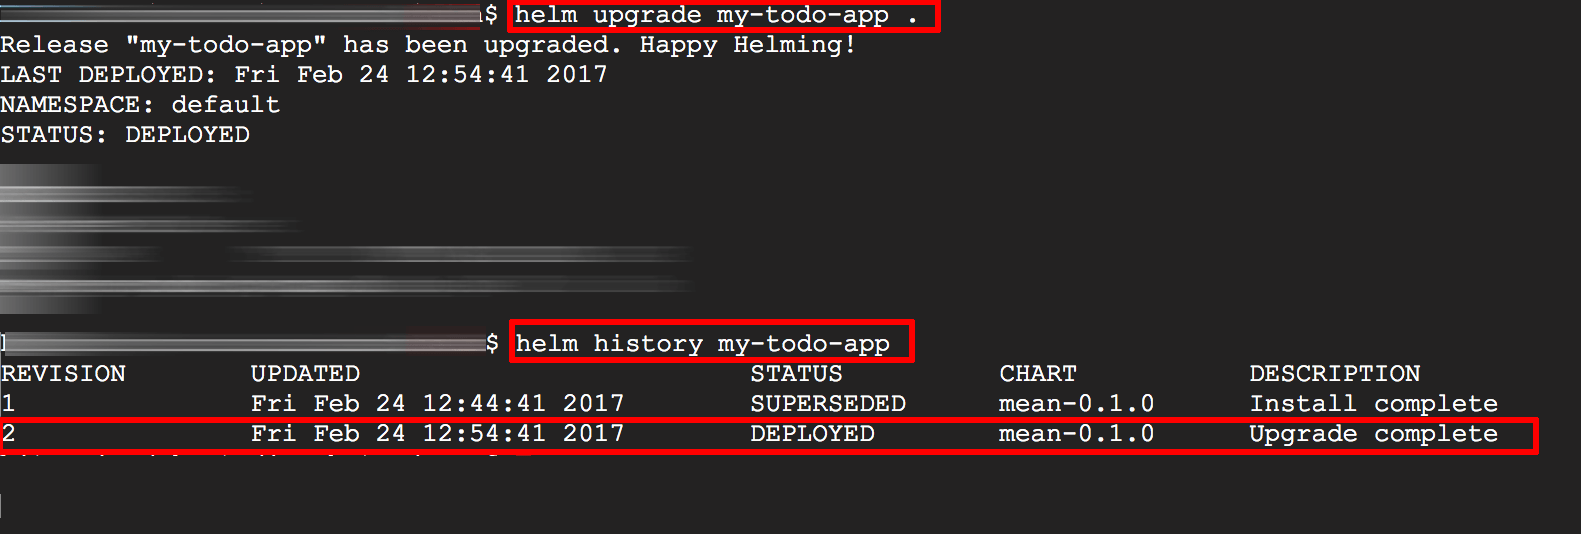
As shown in the output, the application has been upgraded and is now running revision #2.
When performing an upgrade, it is important to specify the same parameters as when the chart was initially deployed. This is particularly important in relation to passwords, as upgrades must specify the same passwords configured in the initial deployment. For example, if the initial deployment was performed with the command
helm install --name my-app --set app.password=secret
the corresponding upgrade command would be
helm upgrade my-app --set app.password=secret
NOTE: Before upgrading, always check the chart documentation to see if there are any breaking changes between the latest version of the chart and its previous versions. Breaking changes are signified through changes in the chart’s major and minor version numbers; patch versions are typically safe to upgrade.
Rollbacks are equally simple - just use the helm rollback command and specify the revision number to roll back to. For example, to roll back to the original version of the application (revision #1), use this command:
helm rollback my-todo-app 1
When you check the status with helm history, you will see that revision #2 will have been superseded by a copy of revision #1, this time labelled as revision #3.

By now, you should have a good idea of how some of the key features available in Kubernetes, such as scaling and automatic load balancing, work. You should also have an appreciation for how Helm charts make it easier to perform common actions in a Kubernetes deployment, including installing, upgrading and rolling back applications.
To learn more about the topics discussed in this guide, use the links below: